This page is for developers who sell their own extensions through Release Manager. It shows how your customers can link their site to their account on your store, so that your paid updates install from Joomla's own update screen. For setting up the store itself, see the Release Manager documentation.
Start here
You don't need to read this whole page. In your store's Release Manager, go to Packages and click Add licensing to your extension under your package. That screen has the routes below with your store URL, element and product name already filled in, and it checks that the package's settings are ready. It needs Release Manager 1.15.0 or later.
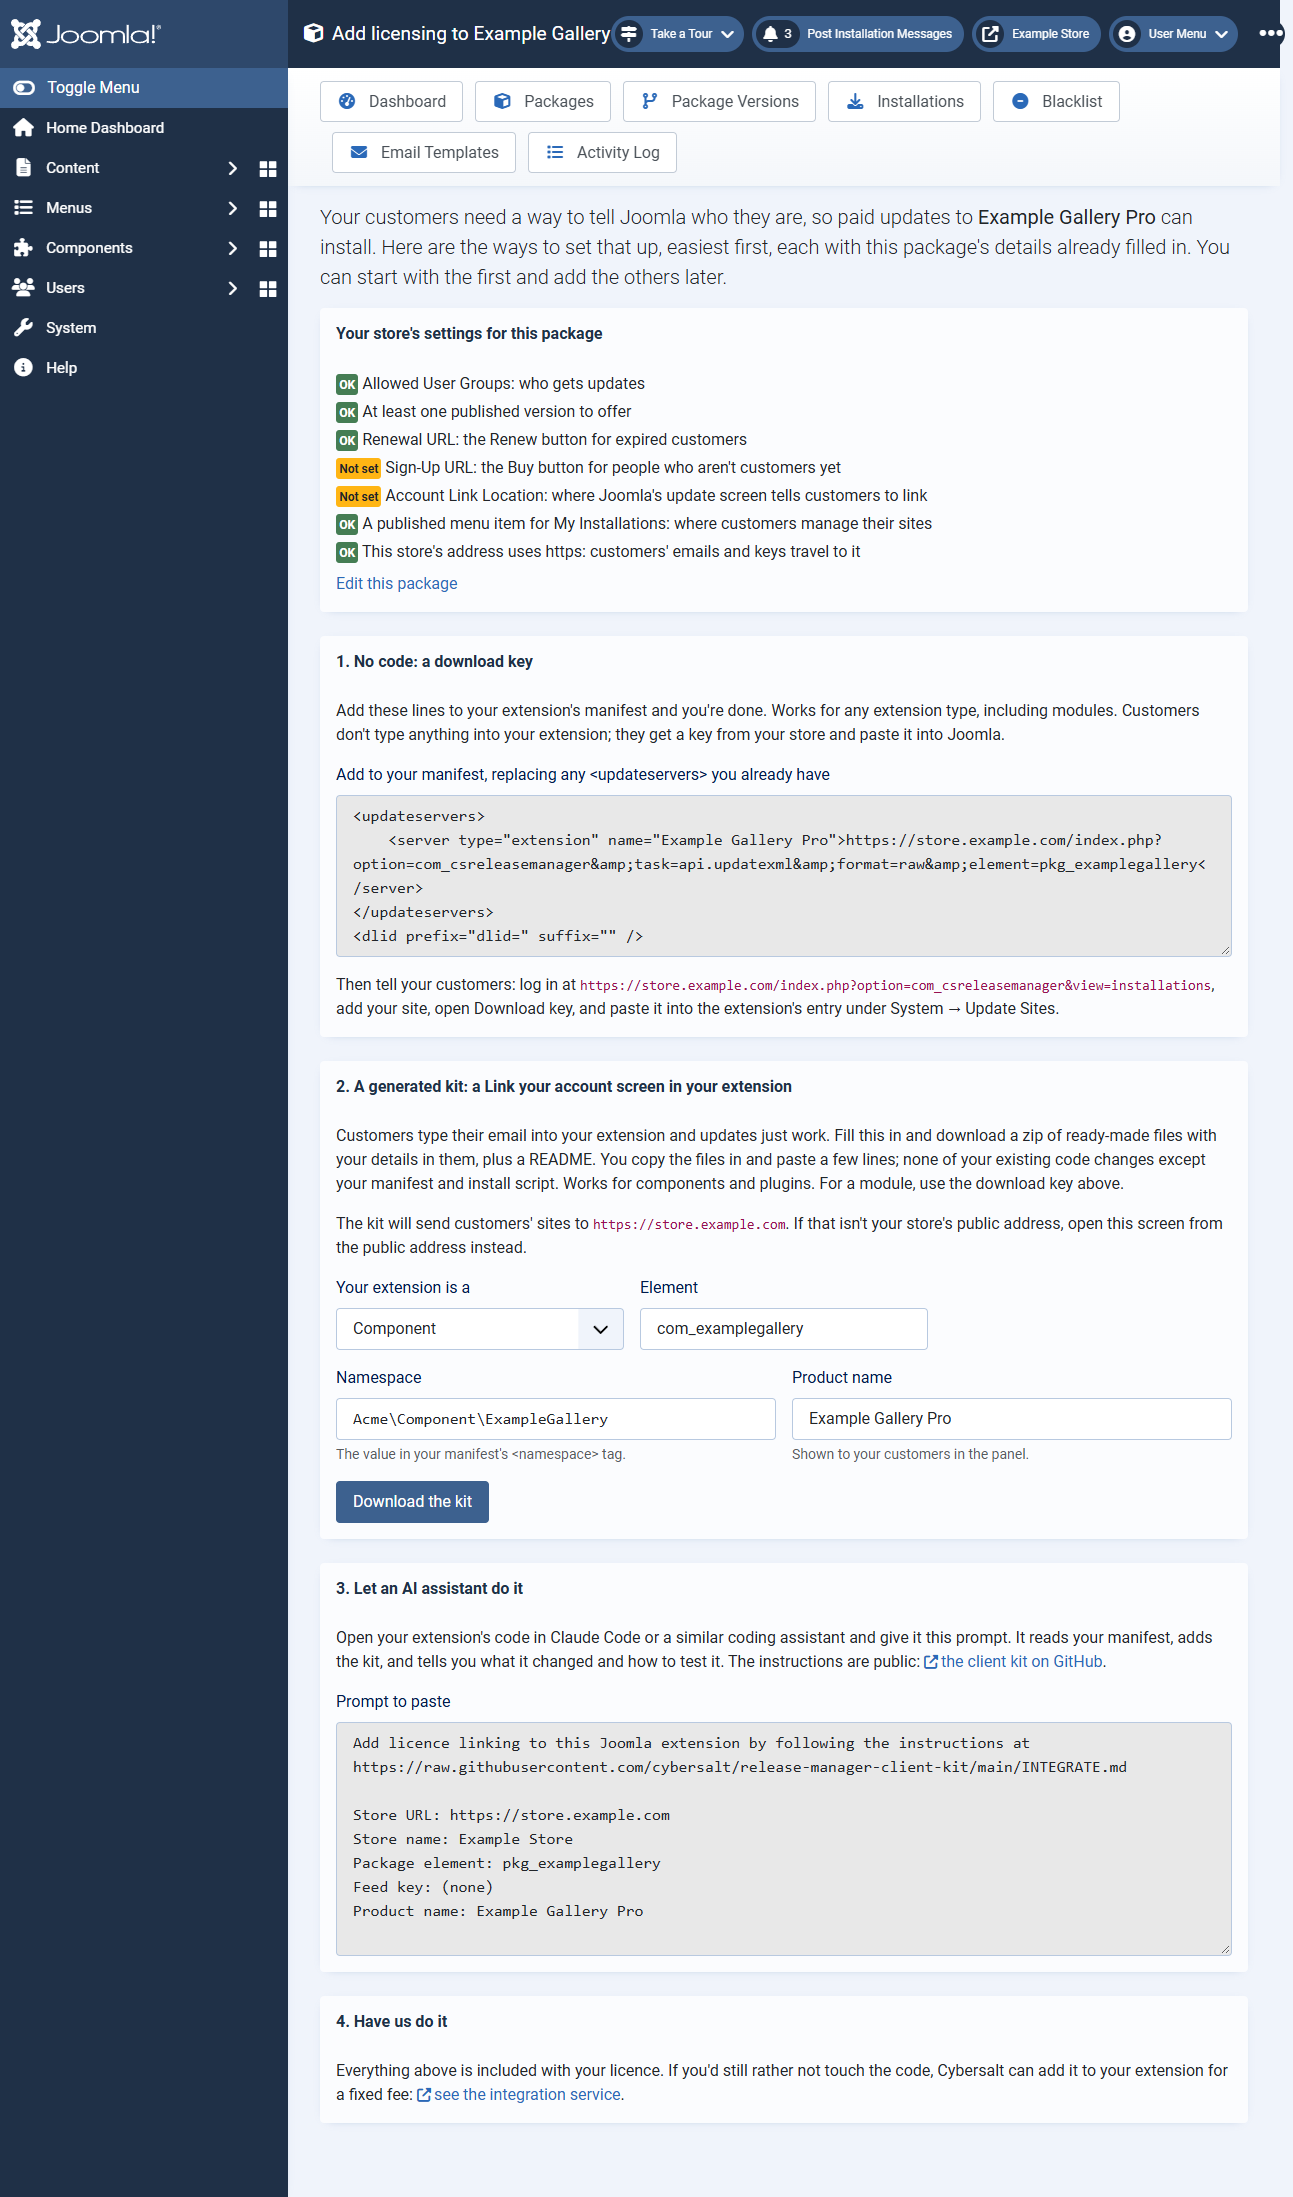 ⤢ Click to enlarge
Pick a route
| Route | What you do | What your customer does | Works for |
|---|---|---|---|
| 1. Download key | Add a few lines to your manifest | Gets a key from your store and pastes it into Joomla | Any extension type, including modules |
| 2. Generated kit | Download a zip, copy files in, paste a few lines | Types their email into your extension | Components and plugins |
| 3. AI assistant | Paste a prompt into Claude Code or similar, then review | Types their email into your extension | Components and plugins |
| 4. We do it | Send us your extension | Types their email into your extension | Anything |
The first three are included with your licence. You can start with the download key and add a Link your account screen later: they work side by side.
Route 1: a download key
Add this to the manifest of what you sell. The Add licensing screen has it with your real address in it.
<updateservers> <server type="extension" name="My Extension">https://your-store.example/index.php?option=com_csreleasemanager&task=api.updatexml&format=raw&element=pkg_myextension</server> </updateservers> <dlid prefix="dlid=" suffix="" />
Your customer then:
- Logs in to your store and opens the My Installations page.
- Under Add a site, chooses your extension, types the site's domain and clicks Add site.
- Opens Download key on the new row and copies the key.
- On their site, goes to System → Update Sites, opens your extension's entry and pastes the key into Download Key.
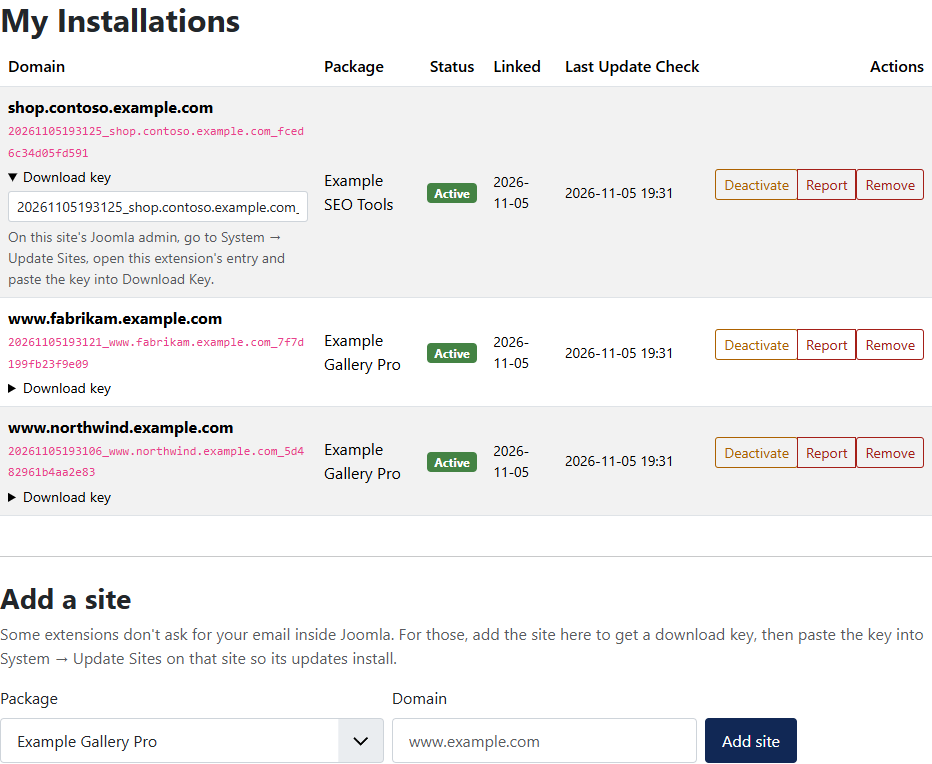 ⤢ Click to enlarge
Site limits, the customer's own blocked domains and your blacklist apply just as they do to any link. To turn this off, set Options → Customers Can Create Download Keys to No. Your store needs a published menu item for My Installations.
Remote site managers. Joomla only sends a pasted key with the download, so mySites.guru and similar tools won't have it when they read the update feed. If your customers use those, the Link your account routes below are the better fit, because they also put the key in the feed address.
Route 2: a generated kit
On the Add licensing screen, fill in your extension's type, element and namespace and click Download the kit. You get a zip of ready-made files with your details in them, plus a README with the exact steps. It only adds files: none of your existing code changes except your manifest and install script.
- Copy the files in. For a component, the new files are a client class, a panel, a small controller, a Link your account screen and a language file. For a plugin, they are the client, the panel, a form field and a language file.
- Paste the manifest lines from
snippets/manifest.xml. They add the menu entry or settings tab, the update server and the download key. - Paste the install-script lines from
snippets/postflight.php. Joomla rebuilds the update site when your extension updates, and these put the key back in its address. - For a plugin, add one method from
snippets/plugin-method.php. The panel posts through Joomla'scom_ajax, so the plugin has to be enabled to link.
Change the wording in the kit's .account.ini file and the layout in
account-panel.php as much as you like. The link is kept in your extension's
custom_data column in #__extensions, under the key csrm_account,
so saving your Options and updating your extension both leave it alone.
Prefer the command line? The same generator is in the public client kit, along with finished examples of a component and a plugin.
Route 3: let an AI assistant do it
Open your extension's code in Claude Code or a similar coding assistant and paste the prompt from the Add licensing screen. It looks like this:
Add licence linking to this Joomla extension by following the instructions at
https://raw.githubusercontent.com/cybersalt/release-manager-client-kit/main/INTEGRATE.md

Store URL: https://your-store.example
Store name: Your Store
Package element: pkg_myextension
Feed key: (none)
Product name: My Extension
The instructions tell the assistant how to read your manifest, generate and apply the kit, and what not to touch. It reports what it changed and how to test it, and it doesn't commit or publish anything unless you ask. Review its changes as you would anyone's.
Route 4: have us do it
If you'd still rather not touch the code, Cybersalt can add it to your extension and test it against your store for a fixed fee. See the integration service.
The store's side
Whichever route you take, the package needs these. The Add licensing screen shows which are missing.
- Public / Free Extension set to No, and the Allowed User Groups your membership plan puts buyers into.
- Renewal URL and Renewable User Groups, so expired customers get a Renew button instead of a dead end.
- Sign-Up URL, for the Buy button people see when they aren't customers yet. Options has a default for packages without one.
- Account Link Location: where your panel is, written to fit a sentence (for example in Components > My Extension > Link your account). Joomla's update screen uses it to tell a customer where to link. Options has a default for this too.
- A Store Name in Options, if customers know your store by something other than your site's name.
What your customer sees
| Answer from the store | Panel shows |
|---|---|
active | Green badge; updates arrive under System → Update → Extensions. |
lapsed | The store's message and a Renew button (the package's Renewal URL). |
not_a_member | The store's message and a Buy button (the package's Sign-Up URL, the store's Default Sign-Up URL, or the Renewal URL). |
over_limit | Every site the licence allows is in use. |
blacklisted | Blocked; contact support. No retry form. |
Why linking needs no email confirmation
Anyone can type any address into the panel, and nothing asks them to confirm they own it. That is on purpose. Your extension is open source, so nobody can be stopped from running it, and a confirmation step would only make it harder for honest customers. Linking gives you and the address's owner what's needed to deal with it instead:
- The address's owner finds out. They get an email naming the domain as soon as a site links to their address. On My Installations they can deactivate or remove the site, or report it as one they don't recognise, and the domain can't link to that address again.
- You get a lead. Every site that registers shows under Installations with its domain, even if it never pays. Filter by status or by Update Access to find sites using your extension without a licence, and write to them about buying one.
- Only entitled addresses get updates. A link only opens updates when the address belongs to a customer in an allowed group, and site limits count against that customer.
Testing it
The kit includes test-link.sh, filled in for your store:
sh test-link.sh . It runs these same calls, which you can also run by
hand. Replace the store, element and email:
STORE=https://your-store.example ID=20261030120000_test.example.com_0123456789abcdef HASH=$(printf %s "This email address is being protected from spambots. You need JavaScript enabled to view it. " | sha256sum | cut -d' ' -f1) curl -s -H "Content-Type: application/json" \ -d "{\"installation_id\":\"$ID\",\"package_element\":\"pkg_myextension\",\"domain\":\"test.example.com\"}" \ "$STORE/index.php?option=com_csreleasemanager&task=api.register&format=json" curl -s -H "Content-Type: application/json" \ -d "{\"installation_id\":\"$ID\",\"email_hash\":\"$HASH\",\"email\":\"This email address is being protected from spambots. You need JavaScript enabled to view it. \"}" \ "$STORE/index.php?option=com_csreleasemanager&task=api.linkemail&format=json" curl -s "$STORE/index.php?option=com_csreleasemanager&task=api.verifyaccess&format=json&dlid=$ID:$HASH" curl -s "$STORE/index.php?option=com_csreleasemanager&task=api.updatexml&format=raw&element=pkg_myextension&dlid=$ID:$HASH"
For an entitled email, verifyaccess answers "state":"active" and the
update feed's download URL carries the dlid. Delete the test installation from
Installations afterwards.
Rules worth keeping
The kit already does all of this. Keep it that way if you change the client, or do the same if you write your own.
- Only touch your own update site. Match it by your store's host and your element. Other vendors' extensions on the same site have their own keys.
- Escape the store's messages. They are shown to an administrator in your customer's Joomla, and Joomla prints system messages as HTML.
- Save the installation ID only after the store accepts it. An ID saved before a failed registration leaves the site sending an ID the store has never seen.
- Make the random part long. The timestamp and domain can be guessed and the email hash is easy to work out, so the random part is the key's only secret. The client uses 16 hex characters.
- Put the key back after updates at the end of the request. Joomla rebuilds the
update site after your
postflight()has run. It keeps the key inextra_querybut not in the address, so writing it inpostflight()itself does nothing for remote managers.
Writing your own client
If none of the routes suit, these are the calls, all on your store at
index.php?option=com_csreleasemanager&format=json&task=…:
- Make an installation ID in the form
<digits>_<domain>_<random hex>(up to 100 characters). api.register:POSTJSON{"installation_id", "package_element", "domain"}. Save the ID when this returns 200 or 201.api.linkemail:POSTJSON{"installation_id", "email_hash", "email"}, where the hash is SHA-256 of the lower-cased email.api.verifyaccess&dlid=<id>:<hash>: the status to show.- Write
dlid=<id>:<hash>to your update site'sextra_query, and append it to the update site'slocationtoo: Joomla only sendsextra_querywith the download, and remote managers such as mySites.guru need the key in the feed URL.
Getting help
Ask through the Cybersalt support form, with your store URL and your package's element.
Add a site on My Installations — click anywhere to closeClose ×